
This is the second part of an occasional series on how to learn the basics of Crusade in Europe, a command-level wargame set during the Northwest Europe Campaign of World War II. Originally published in 1985 by the original iteration of MicroProse and re-issued earlier this year by Atari, Crusade in Europe allows you to step into the role of a theater commander for either the Allied or German forces and refight some of the greatest battles of the war on the Western Front between June 1944 and January 1945. (Or, as the blurb on the original game package puts it, “From D-Day to the Battle of the Bulge.”)
As the writer, I am going to make several assumptions. First, I am taking it for granted that you, the reader, are interested in purchasing – or have purchased – Crusade in Europe from Steam or GOG (Good Old Games) and want some pointers on gameplay. My second assumption is that you’ve already read some of my earlier posts, especially Old Gamers Never Die: A Player’s Guide to ‘Crusade in Europe’ (Part One of a Series) That’s where you’ll find all of the lowdown on the various keyboard commands (action, information, and utility) that I will refer to in the main body of the text.
Anyway, that’s enough chit-chat. Let’s get this show on the road. There’s a war on, don’t you know?
Mission for Today: Initial Attack

You Will Need: a copy of Crusade in Europe (available on Steam for $6.99)
Scenario: The Battle for Normandy
Variant: Clearing the Beaches (Begins at 6 AM, June 6, 1944. Ends at 6 PM, June 11, 1944)
Note: When MicroProse published Crusade in Europe in 1985, the programmers added a password-protection key – known as the Day Codes system – that required users to type in a code word (associated with the campaign) found in various pages inside the game manual. Atari does not include the manual with the game purchase; I found the PDF in the game’s community page on Steam and downloaded it because it is a useful resource. I suggest you do the same, but if you just want the Day Codes, here they are:
Day Codes for Crusade in Europe:
1. TORCH
2. GARDEN
3. GOODWOOD
4. BOLERO
5. MARKET
6. FRANKLIN
7. OMAHA
8. COBRA
9. DAVID
10. TANGO
11. ANVIL
12. TIGER
13. TOTALIZE
14. OVERLORD
15. SHERMAN
16. BLUE COAT
The game seems to work okay if you just type in random words; before I copied the Day Codes from the PDF version of the manual, just typing TIGER, OMAHA, or GOODWOOD worked for me, as the republished versions seem to have disabled the password protection feature. However, just to be on the safe side, I now type in the Day Codes when I boot up Crusade in Europe.

Game Settings:
Player: Allied
Computer: German
Intelligence Level: Limited
Difficulty: Fair
Speed: Slow
Note: As soon as you hit ENTER to exit your Settings page and the battle map appears on the screen, hit the F key to Freeze the game.
Initial Dispositions
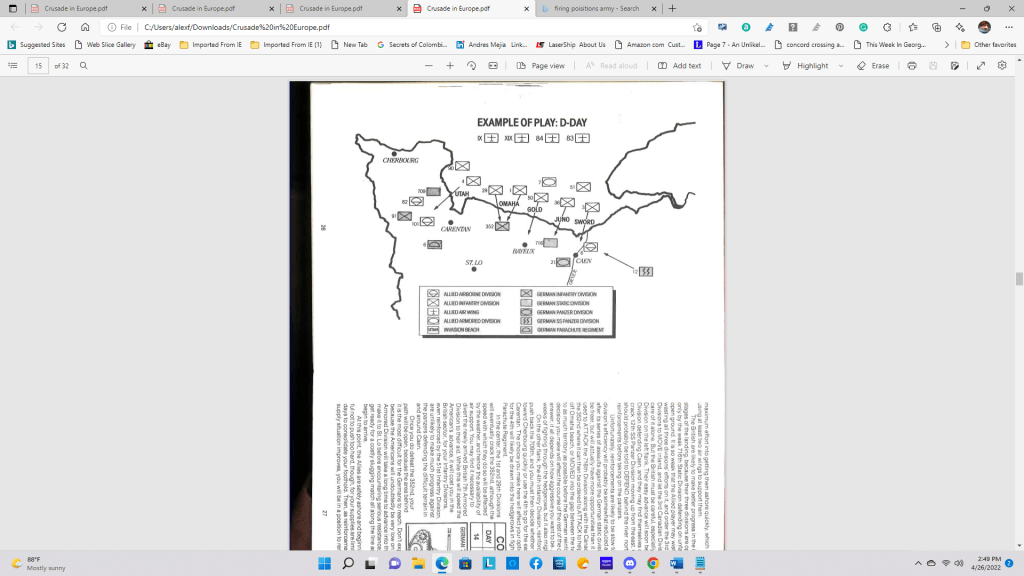
It is 0600 hours on June 6, 1944. Operation Overlord – the long-awaited Allied invasion of Europe – has begun. Along a 50-mile front on the shores of the Bay of the Seine, from the Cotentin Peninsula on the west to the mouth of the River Orne in the east, your first nine divisions – three airborne and six infantry – are in position against the defending German forces in Normandy.
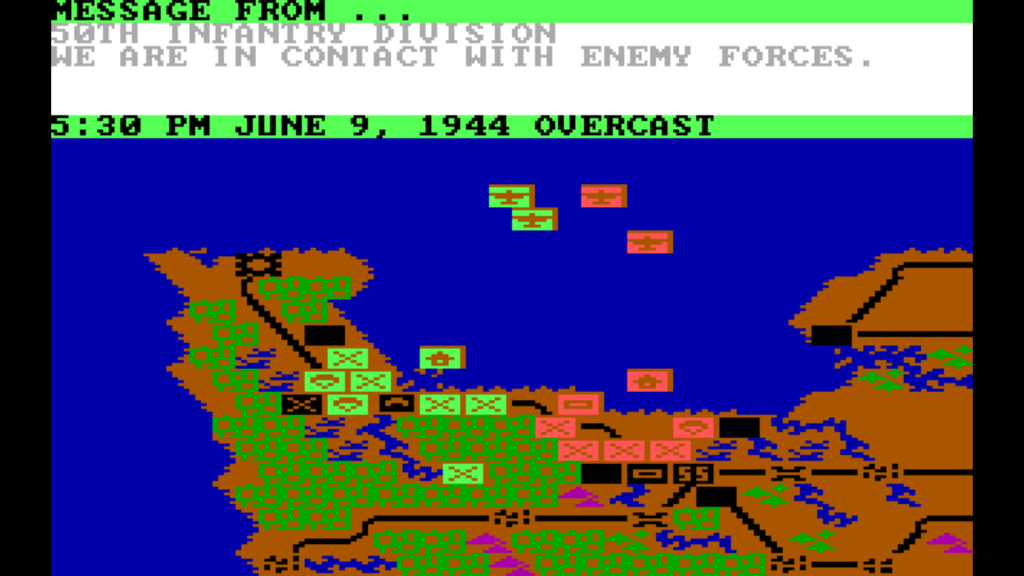
On the right flank[1] of the Allied invasion area, the U.S. 82nd and 101st Airborne Divisions are on their assigned drop zones in Defend mode just behind UTAH BEACH. The 4th Infantry Division is ashore on UTAH north of Carentan and is attacking the 709th Static Infantry Division (SID) to its north. The German 6th Parachute Regiment occupied Carentan, which is in the gap between UTAH and OMAHA Beaches.
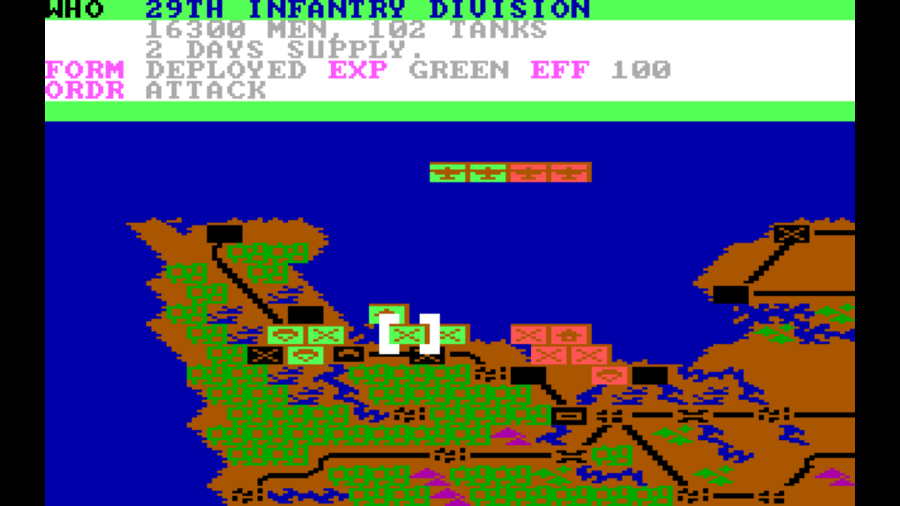
At OMAHA, the U.S. 29th and 1st Infantry Divisions are attacking the dug-in 352nd Infantry Division.
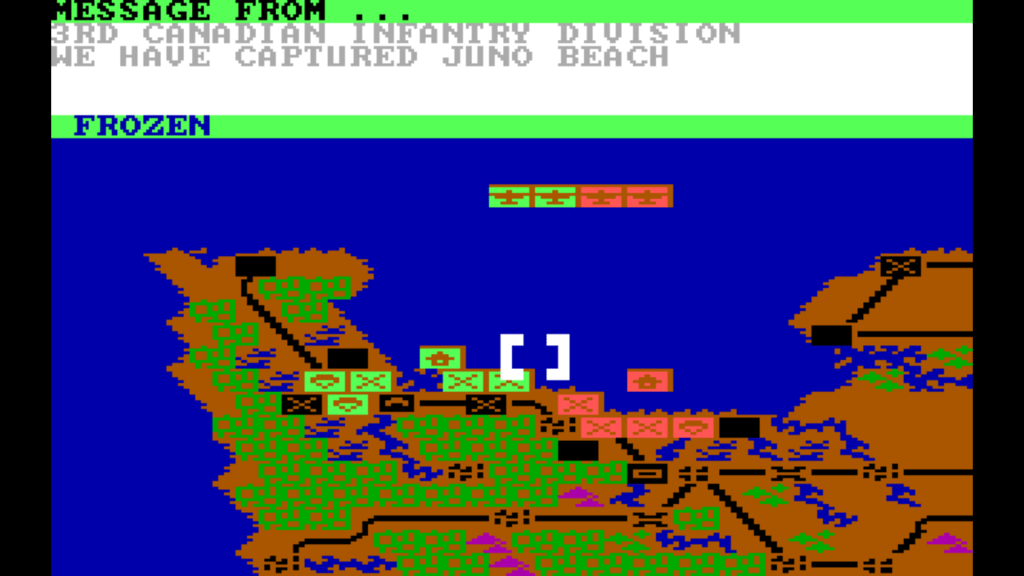
To the east of OMAHA, the British 50th Infantry, 3rd Canadian, and 3rd British Infantry Divisions are coming ashore on GOLD, JUNO, and SWORD Beaches. They are only opposed by the 716th Division, although the 21st Panzer (tank) Division is in position in Caen, just to the south of GOLD Beach. At the far left of the British/Canadian sector, the British 6th Airborne is in Defend mode on its drop zone east of the Orne River. The Germans have a Static Infantry Division to its east, and the SS 12th “Hitler Youth” Panzer Division is some distance away but it will head to the invasion area during the late afternoon and early evening hours.
Oh, yeah. To the north of the first wave of the invasion force, the four Allied tactical air wings seem to “float” on the English Channel as though they’re based on aircraft carriers. They are not “really” there. The U.S. IX and XIX Tactical Air Wings and the British 84 and 83 Tactical Air Groups are actually based in England, but game designers Sid Meier and Ed Bever place them on the SEA to make it easy to give your air support units orders without having to scroll up all the way to Southern England, which in this scenario is off the map.
Reminder: Do not unfreeze the game until you issue your first orders.
Your Orders, Sir?
Whenever I play Crusade in Europe – especially in Normandy-set battles – I always issue orders to units according to their positions on the map. I like to start on the western side of the map and work my way east, then I issue orders to my air wings. The computer cycles through the units in this fashion anyway, so even if you issue orders to your air forces first in the hopes that the airstrikes will “soften up” the enemy units before your infantry attacks, the computer will still cycle through the units the way I described, and the air units will attack last anyway.
The first thing you need to do is to tell your airborne units to dig in and Defend. They already start in Defense posture, but it’s good practice to issue orders to your units rather than to let them stay under Local Command (i.e., under the game’s artificial intelligence). So move your cursor over the 82nd and 101st Airborne and reissue the Defend order (D followed by H for Here) and keep them where they are.
“Why?” I hear you asking. The airborne drops were made at night, and for various reasons the U.S. airborne divisions were scattered hither and yon. Not as badly as many accounts claim, but the game takes that into account – I think – so the airborne divisions are not in any shape to carry out attacks. Besides, their mission was to protect the right flank of the invasion area from enemy counterattacks. Right now, the 82nd and 101st are shielding the 4th Infantry on UTAH from the German 91st Infantry Division[2], which is a regular infantry unit with better troops and equipment than the purely defensive 709th.

Speaking of the 4th Infantry Division (the “Ivy” Division), it is already assigned to attack the 709th SID to its north. Reissue the Attack command just to get used to giving orders. Avoid the temptation to switch targets from 709th SID to the 6th Parachute Regiment. Focus on battering the larger division, though it is unlikely that you will dislodge on June 6.
Next up: the U.S. 29th and 1st Infantry Divisions are attacking the 352nd Infantry Division at OMAHA. The Germans hold this critical (31 Victory Points) location; you need to come ashore ASAP and capture it. So even if the Local Command has already placed them in attack mode, go ahead and order them to Attack the 352nd.
In the British sector, you have quite a few more options. You could, in theory, order the 50th Infantry Division to attack the 352nd at OMAHA and assist the Americans. However, if you do that, it might be late afternoon (in-game) by the time you see the 50th be in contact with that enemy unit. Sure, it might pressure the Germans off OMAHA, but it will also open a two-hex (12-mile square, based on the hex size) gap between the American and British sectors. Best bet: Order the two British divisions at SWORD and GOLD to move inland (the 50th with the Move command, the 3rd British Infantry to Defend at a point two hexes to the south (on the Orne River), while you Attack the 716th SID with the 3rd Canadian Infantry Division from Juno.
Because air units pack a strong punch but are particularly prone to suffer high casualties quickly, use them sparingly. Because the 352nd Infantry Division on OMAHA is difficult to push out of its defensive position, you can try ordering both American air wings and one British to attack that, then assign the other British to strike another target.
I usually target the 6th Parachute Regiment in Carentan with one air wing on D-Day; you can try to bomb the 21st Panzer in Caen, but usually – unless you set your difficulty levels to give yourself better odds – the German armor holds its own and inflicts heavy losses on your air wing. Attacking SIDs will give you better results, depending on their condition, but attacking the Germans in Carentan is a win-win for you. You inflict heavy casualties on the enemy while suffering low casualties yourself.
Speaking of casualties: every Allied unit, even the paratroopers, starts out at 100% effectiveness, but this will change quickly, depending on how stiff the enemy resistance is. Usually on Fair level, the 4th, 29th, 1st, and 3d Canadian will suffer Moderate to Light casualties during the daylight hours when attacking German units. It has been my experience with Crusade in Europe that units on the Attack will strike at enemy units until they reach 70% effectiveness. At 70% effectiveness, they will react slowly to orders to attack, and they will report that their losses are heavy. At higher difficulty levels, most of the Allied attacks (especially those by units with less experience) will result in high casualties.
Regarding Unit Experience: I neglected to mention that all units have their own experience levels, which range from Raw (the lowest level) to Elite. The higher the experience level, the better the unit can attack, defend, or move.
Per the Crusade in Europe manual:
A unit’s EXPERIENCE rating reflects the extent to which it has been trained for and involved in combat. During the game, particularly during the longer scenarios, units will advance in status as they gain combat experience.
1. RAW: The unit has had no combat training and no combat experience. Don’t expect much from it.
2. GREEN: The unit has been trained but has no prior experience. Green units will perform adequately under normal conditions but cannot be expected to hold up under extreme pressure.
3. VETERAN: The unit has had prior experience in combat and can be expected to perform well in all situations.
4. CRACK: The unit has had extensive combat experience and has proved to be highly motivated and skilled in the techniques of war. A good unit to have in a tough situation.
5. ELITE: The unit has extensive combat experience, specialized training, and high esprit de corps. Expect it to perform far beyond its numbers.
Both sides will have forces with a mix of units with different experience levels. On Fair difficulty setting, most Allied units will either be GREEN or VETERAN, with the U.S. 1st Infantry being the only CRACK infantry division available. All three airborne divisions are ELITE. However, on this first day, don’t push them to ATTACK. They are already in Defend mode, and it takes “hours” (in-game) to change from one mode to another.
D-Day and Beyond

During the first day of Clearing the Beaches, you will likely have two or three order cycles in which you can attack the German defenses with your infantry and air wings in daylight. Usually, the game cycles through both sides’ armies in the early morning, then close to noon, and then before dusk. Unless the enemy AI makes a mistake – yes, it does happen – and an enemy unit moves in such a way that you can exploit a sudden weak point, stick to the plan, and keep attacking the same German units you struck at earlier, especially at UTAH, OMAHA, and JUNO.
On the real June 6, 1944, the Americans pushed the 352nd off OMAHA by early afternoon on D-Day itself. I might have achieved a similar result back in the late Eighties when I played Crusade in Europe on my Apple II (with an advantage for the Allies, at that), but with play balanced on Fair or even skewed toward the Germans, the Americans do not capture OMAHA until June 7.
Do not continue offensive operations at night (you’ll know when night falls because the map and unit counters will change color). If you have ordered divisions to Move or Defend toward specific locations, give them time to follow orders. Remember, terrain affects how quickly a unit moves, and it is likely that some of your units are moving off the beaches and onto rougher ground. The 3rd British Infantry Division will take till the early hours of June 7 to reach its objective just south of the 6th Airborne’s bridgehead on the Orne. Once it arrives, let it dig in and fortify its positions. Do not attack the 21st Panzer at Caen, even though that city was an objective for D-Day itself in June of 1944. The tanks are too well dug in, and you will not dislodge them from Caen.
The reason for placing the 3rd British Infantry at that point on the map is this: The 12th SS Panzer (known as the Hitler Jugend) Division is coming from the east, and your mission is to force the German armor to attack your fortified positions and wear the panzers down. If your division is in Entrenched or Fortified formation by the time that 12th SS Panzer arrives either on the 7th or 8th of June, your casualties should be either low or minimal, while the “Jerries” will be forced to stop their attack and dig in as well.
On June 7, the British and Americans will start getting reinforcements. In the American sector, the 90th Infantry will be offshore right next to the pesky 709th SID, which more than likely has not budged from its positions north of UTAH. Order the 90th to Attack in conjunction with the 4th Infantry Division. Leave the two airborne divisions where they are; they are not even at full strength (the game gives the paratroopers a maximum of 10,000 men and no tanks), and their role is defensive in this scenario.
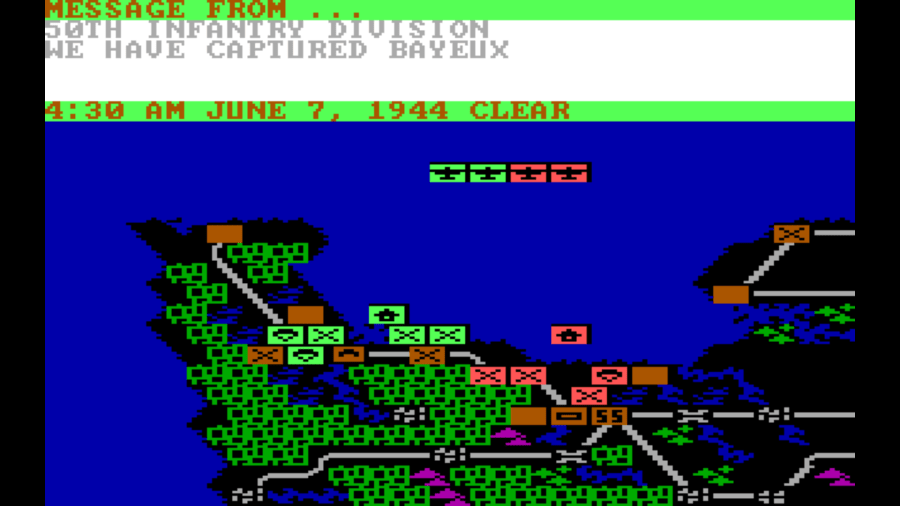
If the 29th and 1st Infantry Divisions are at 80% efficiency or better (they will not be at 100%, though), order them to attack the 352nd at OMAHA. Then order the British 50th to capture Bayeux (12 VPs) and, if it can, to help the Canadian 3rd deal with the 709th SID. And as with its American counterparts, the British 6th Airborne must be allowed to dig in till it is Fortified. Do not order it to attack any German static divisions that park themselves next door, so to speak.
If my experiences with Crusade in Europe are any guide, your four air wings probably won’t be as useful on June 7 as they were on D-Day. If the IX Tactical Air Wing is at 80% efficiency or better, sic it on the 352nd. It will likely suffer heavy losses, but the 352nd is probably at 60-50% efficiency and it might be dislodged by the “doggies” of the Blue and Gray or the Big Red One Divisions by noon orders cycle. In any case, if you can use one or more of the air wings, bomb the 352nd and/or the 6th Parachute Regiment in Carentan.
However, if the IX Tactical Air Wing or any of the other three wings is at 70% or less, order it to go on Reserve. It will thus not be available for air support missions, but it will recover its efficiency over time.

The British 7th Armored Division and the British 51st Infantry Division should be available on the night of June 7. Since they arrive after dusk, they should just be Moved to link the British beachhead with OMAHA.
I am closing this post here, but since Crusade in Europe has no Save functionality – a good reason for Atari to create a reboot, I think, or at least to allow the “new” MicroProse to make its own remake – you should play the rest of this short scenario (it ends at 6 PM on June 11) to its conclusion. Just remember that when American and British units enter “hedgerow country,” their movement rate is slower, and the terrain favors the defender. Try to establish a contiguous perimeter, and on the attack, use two or three divisions against one German.

Good luck, General! The eyes of the world are upon you. The hearts of liberty-loving people everywhere are with you.
[1] The Allied “right” flank is shown on the left side (western side) of the scrollable map because the American, British, and Canadian forces are attacking mainly on a north-south axis of advance. The American divisions in Normandy were assigned to the “right” flank based on where they had been assembled in England (usually in or around ports that were closest to the United States), while British and Commonwealth forces were assigned to the “left” flank, again, based on the assembly areas they were based in before the Channel crossing on the night of June 5-6, 1944.
Interestingly, this arrangement was the source of some controversy when sometime in 1943 or 1944, FDR expressed his desire that Berlin should be in the U.S. occupation zone after the war. This would have required flipping the British and American occupation zones so that the U.S. forces would be based in northern Germany whilst the British occupation army would be garrisoned in the south. President Roosevelt backed off when he was not only reminded that Stalin would not look too kindly at the notion of Western encroachment on the Soviet zone of occupation, but that the logistics of switching the Anglo-American zones would be too expensive since the invasion routes had been chosen according to where U.S. forces were situated upon their arrival in Britain.
[2] This division should really have been named the 91st Air Landing Division (91. Luftlande-Infanterie-Division), but I think that might have confused players unfamiliar with the organization of the German army.

Comments
One response to “Old Gamers Never Die: A Player’s Guide to ‘Crusade in Europe’ (Part Two of a Series)”
[…] played Crusade in Europe for a while yesterday so I could write Old Gamers Never Die: A Player’s Guide to ‘Crusade in Europe’ (Part Two of a Series). I might have been able to create that post without playing, but I don’t often write “how-to” […]
LikeLike