
Pre-Mission Briefing

In preparing for battle I have always found that plans are useless, but planning is indispensable. – General of the Army Dwight David Eisenhower
Hello and welcome back to another installment of my continuing look at the classic 1985 game Crusade in Europe, which was re-released earlier this year by Atari.
Designed by the legendary Sid Meier – who is best known for his Sid Meier’s Civilization and Sid Meier’s Masters of Orion series – and Ed Bever for the original iteration of MicroProse Software, Crusade in Europe is a command-level strategy game based on the Allied campaign to liberate Western Europe from, as the packaging blurb puts it, “D-Day to the Battle of the Bulge!”

Here’s a brief description from the Steam Store page:
Crusade in Europe is a classic real-time simulation game from the 80s designed by Sid Meier and Ed Bever. The first title in the “Command Series” of tactical wargames from MicroProse, the game features real-time battles that test your skills as a commander.

For brevity’s sake, as well as for my sanity, I am going to assume that:
- You are interested in buying – or have bought – Crusade in Europe on Steam or other reputable resellers, such as GOG (Good Old Games)
- You have read previous posts in my Old Gamers Never Die series about this game[1]
- You are already familiar with the various command keys (A for “attack,” D for “defend,” H for “objective here,” “?” for “check status,” etc.
All right, troops? Is everyone ready? Lock and load!
Terrain & Movement

As a commander – it doesn’t matter whether you are playing as the Allies or the Germans – you will find that Crusade in Europe does a good job of simulating the effects of the terrain upon armies in the middle of the 20th Century, especially the heavily mechanized divisions of the American, British, and Canadian armies that landed in Normandy in the spring and summer of 1944.
As even casual students of World War II know, one of the main factors that determined the speed of the Anglo-American forces in northern France was the then-extensive bocage region of Normandy. Here, farmers had, since the times of the Caesars, used hedgerows as natural fences between individual plots of land.
These hedgerows were not like those neatly trimmed, six-foot-high hedges found in southern England and seen in movies where the rich and powerful jump over them astride their graceful horses during a fox hunt. Instead, the hedgerows of Normandy – first invented by the Romans who conquered France during Julius Caesar’s campaigns there – consisted of six-foot-tall earthen mounds topped by thick tangles of vegetation that were often up to 16 feet high. The mounds were baked by the sun for literally centuries, and the hedges themselves were so thick that the GIs could not simply drive a Sherman tank through without modifying it first.
In an inexplicable lapse by Allied planners – the intelligence officers at Supreme Headquarters, Allied Expeditionary Force (SHAEF) had thousands of photographs of the Normandy area, either taken by aerial reconnaissance planes or submitted by the public after a public plea for postcards and photos taken by vacationers in northern France before the war, so they knew the bocage country existed – most of the training by the American, British, and other Allied contingents focused on the initial beach assault on D-Day and little else. In every book I’ve read about the Normandy campaign – and I’ve read many – the idea that comes across is that the staff officers who planned Overlord underestimated the difficulties that a modern army would face in the confined spaces of the bocage.

As Logan Nye of We Are the Mighty wrote in a 2017 article that was reprinted in Business Insider:
These walls of vegetation were thick and seemingly impossible to quickly cut through. And the hedgerows were everywhere, an aerial photo of a typical section of the battlefield showed over 3,900 hedged enclosures in less than eight square miles.
Each of these enclosures was a virtual fortress, and the Germans had spent months preparing their defenses. They practiced moving through the hedges, selected areas for machine guns and anti-tank weapons, and practiced firing from trees into nearby enclosures.
Perhaps most importantly, they had planted stakes near the most likely routes of American troops and had mapped the locations of the stakes by coordinates, allowing defenders to quickly and accurately call fire onto the advancing Allies.
Compounding the problem was the irregular shape of the enclosures. The rows weren’t laid out in a proper grid. Instead, they were roughly rectangular as a whole, but with a variety of sizes even among adjoining fields. And all of these fields were connected primarily by thin wagon trails that wound through the irregular enclosures.
All of this combined to form a defender’s paradise and an attacker’s hell. In the first days of the Battle for the Hedgerows, American troops would assault an enclosure at full speed, attempting to use velocity and violence of action to overwhelm the defenders. German machine guns pointed directly at these openings cut them down instead.

Because Crusade in Europe is a strategy map-and-symbols wargame and not a first-person shooter (FPS) or a tactical level vehicle simulator, the terrain is depicted only as rough representations of the various types of ground that were fought over during the 1944-45 campaigns. But the effect of terrain on the attack, defense (especially defense) and movement is important for you to understand if you’re going to succeed as a commander in Crusade in Europe.
Per the Crusade in Europe manual:
Each hex on the map contains a terrain symbol which describes the dominant type of terrain in that area. Terrain affects movement, combat, and supply. The symbols are identified on the center color insert.
1. CLEAR: represents an area with no notable features. Good attack country for tank-equipped units.
2. ROAD and ROAD JUNCTION: represents an area traversed by a major road. Road terrain speeds movement, especially for mechanized and motorized units. Good attack country for tank-equipped units.
3. CITY: represents a major town or city. Cities are not too difficult to move through. Infantry units are quite effective in cities —both attacking and defending —while armor is at a disadvantage. Note that many cities are also Victory Point locations.
4. RIVER: rivers impede movement for all units. Units on a river hex benefit when defending, but are penalized when attacking.
5. BRIDGE: units can move through bridges relatively quickly, and benefit when defending on them.
6. FOREST: heavily wooded areas. Difficult for mechanized and motorized units to move through. Good defensive locations, especially for infantry.
7. HEDGEROW: hedgerows were peculiar to the Normandy “Bocage” country. Small fields surrounded by thick hedges made mechanized movement difficult and aided defending units.
8. POLDER: The Dutch “Polder” consisted of low-lying fields crisscrossed by numerous canals. A nightmare for mechanized movement and combat.
9. MOUNTAIN: very difficult movement and attack, particularly by mechanized units; excellent for defense, particularly by infantry units.
10. SWAMP: swamps are difficult to move into, especially for mechanized units. Swamps provide excellent defensive locations.
11. FORTIFICATION and FORTIFIED CITY: Fortified areas are strong defensive positions, yet unlike much defensive terrain they can be moved through easily.
12. COASTAL: These areas are of two very different types. Those that are primarily land are treated as clear terrain; those that are primarily water are treated as sea.
13. SEA and ESTUARY: These areas are impassable to all units, except in the Normandy scenario. In this scenario alone, Allied units generally start in sea or coastal areas. Most units may move only onto adjacent land areas. Air units and the supply depot are placed at sea for convenience (they were actually based in England) and may be moved onto land as the beachhead expands. Units on the sea are very vulnerable to attack.
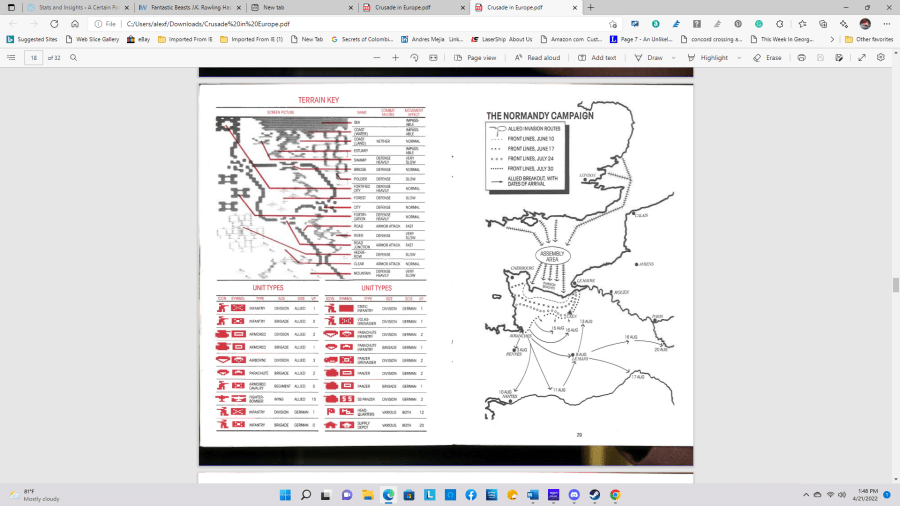
The rule of thumb to follow in Crusade in Europe is the tougher the terrain, the more advantageous it is for the defense. This is important because both sides will have to attack and defend at different stages of either a single battle or the grand Crusade: The Battle for France campaign.
For instance, your mission as the Allied Supreme Commander is to destroy the German armies on the fields of France, the Low Countries, and – if you get that far – the western frontiers of the Reich and liberate Northwest Europe from the Nazi occupation. This means that you are primarily the “attacker.”
However, war is not a one-way affair in which one party does the attacking and the other either defends, runs away, or surrenders. In 1944, the offensive-minded German army was proficient in defense but preferred a proactive offensive ethos to a static positional warfare one like that of the First World War.
Therefore, just as in the real world campaigns in 1944, even if you choose to always play as the Allies, you will find that even in the initial phase of the Normandy scenarios, many of your divisions – particularly the infantry divisions in the British/Canadian sector and the three airborne divisions on both flanks of the invasion area – will have to dig in and defend even on D-Day itself.
See, the German goal is to prevent the Allied forces to clear the five invasion beaches – all of them CRITICAL Victory Point locations in the Battle of Normandy scenarios – and connect them to create a large lodgment area from which they can break out and push on to Paris and the interior of la belle France. To achieve this, the German high command will commit many of its best panzer (tank) divisions and launch counterattacks to drive the Allies into the sea.
This, of course, means that even though your ultimate objective is to push south and east toward Paris and other cities in France, you will more than likely have to form a defensive “shield” – primarily with your infantry divisions – and let the Germans exhaust themselves against your strongpoints. And knowing how terrain affects combat and movement will assist you in choosing your main line of resistance.
Weather

Another factor that Crusade in Europe simulates well – if even more abstractly than terrain – is the weather. Like with terrain, weather conditions have an effect on how the campaign is fought, although in general it affects the Allies, which, in addition to needing good weather for mobile operations on the ground – tanks, jeeps, and other vehicles tend to get mired in muddy ground, after all, and can’t advance quickly when the weather is bad, depend greatly on the availability of air support from the tactical air wings that represent the Anglo-American aircraft solely tasked with that combat role.

Again, let’s see what the good Crusade in Europe game manual has to say about the topic:
Good weather speeds movement and makes attacks easier. Poor weather slows movement and favors the defender. Air units are particularly affected by bad weather; they cannot fly in weather more severe than rain. Possible weather conditions in order of severity are Clear, Overcast, Fog, Rain, Snow, Sleet. Movement and combat are also more difficult at night.
The manual – further down in the chapter about the various factors that affect movement – points out that weather does not have much of an effect on German units, other than the fact that if Allied fighter-bombers (or Jabos, as the Germans referred to them) can’t fly in inclement weather, Wehrmacht forces in the West get a respite from Allied airstrikes.
Although the manual claims that air units can fly in Rain conditions, my experience with Crusade in Europe does not recommend it. Air wings are glacially slow to respond to attack orders if you issue them on days when the weather strip on the map screen shows any weather condition worse than Overcast. Also, fighter-bombers suffer higher casualties and don’t do as much damage to enemy units in adverse weather.
So, General, remember: to win in battle, you not only have to come to know – and love – the ground you will be fighting on, but you also must develop a good weather eye before making your plans.
Sources:
Crusade in Europe game manual, pages 22-24. Published in 1985 by MicroProse Software
Why some of the Allies’ toughest fighting in Normandy came after D-Day, by Logan Nye, We Are the Mighty (via Business Insider), 2017
[1] Such as Old Gamers Never Die: A Player’s Guide to ‘Crusade in Europe’ (Part One of a Series), for instance!

Comments
One response to “Old Gamers Never Die: A Player’s Guide to ‘Crusade in Europe’ (Part Three of a Series)”
[…] Old Gamers Never Die: A Player’s Guide to ‘Crusade in Europe’ (Part Three of a Series) […]
LikeLike